
 One of the more popular and sought after vintage Barbie Fashions is Suburban Shopper (#969, 1959-1964). The dress alone in good condition can run about $25 and up. Add in the accessories (phone, hat, shopping basket, necklace and shoes) and the price jumps to $50 or even $100. For a budget conscious collector such as myself, these prices are far beyond what I will spend!
So off I went in search of a TLC Suburban Shopper. It was clear from the start, that I’d have to let go of the accessories – they are hard to find and often expensive.
Instead, I focused on finding a TLC dress. Seeing as this is a popular fashion that was in production for five years, finding it isn’t too difficult. However, it can be pricey because there is a strong demand for this particular fashion. I ended up finding one in pretty rough shape for the bargain price of $5. Let the TLC games, begin!
The front of the dress was covered in brown age stains and a couple of unidentified dark spots on the white stripes (of course!).

To make matters worse, the stitches of a bad previous repair job can be seen along the bodice dart seams and the skirt/bodice seam.

The back of the dress is just as bad as the front. Dark stains (likely rust) hover around the zipper.
It only gets worse on the inside of the dress. One of the straps has fallen victim to a bad repair job. A wad of stitches going every which way actually shortens the strap to an ill-fitting length.

The bodice/skirt seam was also “repaired” with another wad of stitching. The stitching is so bulky, the waist doesn’t fit on the doll – one side shifts up at an angle.

It’s as bad as it looks! However, some needle and thread, along with a good washing turned this disaster of a dress into something really special.
The Brown Age Stains
Luckily, the brown stains covering most of the dress came out with just a basic treatment. I soaked it in a mixture of water, baking soda, and peroxide for two hours. Then, I laid it out to dry in direct sunlight. I repeated this process three times and the stains completely disappeared. All that was left behind were the darker spots.
The Dark Spots
It’s usually not recommend to use bleach on vintage fabrics, but the dark spots were pretty stubborn. Seeing as they were on the white stripes, (and I’d only be out $5 if this didn’t work!), I decided to chance a bleach treatment. I dabbed each spot with a Q-tip lightly loaded with diluted bleach.
I repeated the process until the spots started to lighten, all the while careful not to bleed the bleach onto the blue stripes. After the last dabbing, I gave it a good rinse and dried the dress in direct sunlight. By some miracle, the spots were completely gone!
Bodice Dart “Repair”
To fix the previous poor repair, I carefully removed the stitches with a seam ripper. I found a small hole in the bodice dart and also realized one bodice dart was shorter than the other. Both problems were solved with a simple straight stitch along the dart seam, plus a few extra stitches to even out the length difference.
Strap “Repair”
Ripping out the previous repair stitches was quite the chore. Removing a “pile” of stitches poses the risk of accidentally tearing the fabric – especially on more fragile vintage fabric. I took my time and removed one layer of stitches at a time.
Once the stitches were gone, I could actually see the original sew line of factory stitches! That made my job a lot easier. I simply lined up the the sew line to the bodice seam allowance and stitched the strap back into place.
There were some strange stitches running down the zipper flap, but I decided to leave them in as they aren’t effecting the look of the dress or the fit. They’ll just be part of this dress’s story!
Bodice/Skirt Seam “Repair”
Oh, this was a mess. The wad of stitching took more than an hour to pick out. I had to be even more careful about not tearing the fabric because of the added bonus of gathers. Gathered fabric often has a separate line of stitches aside from the seam. If this was the case, I wanted to be sure to preserve as much of the original stitches as possible.
Underneath the wad, I found a mostly intact original seam. There was just a small hole that required only a few stitches to fix. I am baffled as to why it was previously repaired with a mountain of thread!
The end result was far more than I expected for my $5 purchase. It’s amazing what a few basic sewing skills and good washing can do!
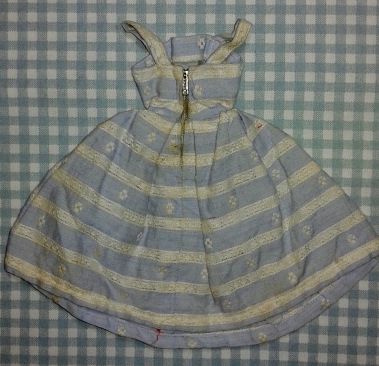
Here’s the front of the dress after repairs and a visit with a steam iron. The stains are gone and all seams are fully restored.

The bodice looks a lot better with properly repaired darts.

The back of the dress also looks pretty good!

My repair on the strap is hard to see, just as a repair should be! No more wadded stitching and the strap is now at its correct length.

My repair on the waist seam blends right into the original seam. Without that wad of stitches, the waist once again fits the doll.

Perhaps one day I’ll piece together the accessories for my Suburban Shopper fashion, but until then I’ll just enjoy how pretty my Bubblecut Barbie looks in her restored dress.

More Vintage TLC projects are in the works. I recently got my hands on an Enchanted Evening gown (#983, 1960-63) and Movie Date (#933, 1962-63). Stay tuned for more vintage fun!
– – –
c.b.w. 2016

I love hearing about the TLC you are giving these vintage Items. The dress looks wonderful and I’m sure Barbie is quite proud.
LikeLike
It’s a lot of work, but I sure do enjoy the end result. 🙂
LikeLiked by 1 person
Gosh, for all that hard work, surely the Barbie gods will manifest those adorable accessories for you!!
LikeLike
If only it worked that way in Barbieland! 🙂
LikeLike
Wow! These results are fantastic! 🙂
I wonder if the original repairs came from a child. I know I did some awful things to torn seams when I was 7 or 8, as embarrassing as that is to admit.
LikeLike
I’m guessing the repairs were from a child – I think that’s why I left some of the stitches along the zipper. The history of this wonderful little dress should remain somewhat intact. 🙂
LikeLike
🙂 I love that!
LikeLike